 Moon Suite
Build your own
Show your Home Assistant dashboard on a TV, signed in and without the menus
Jun runs Home Assistant at home and wanted the kitchen TV to show it all day, without a login screen or a sidebar. Four small changes made the page load, sign in and look like a wall display.

What you get
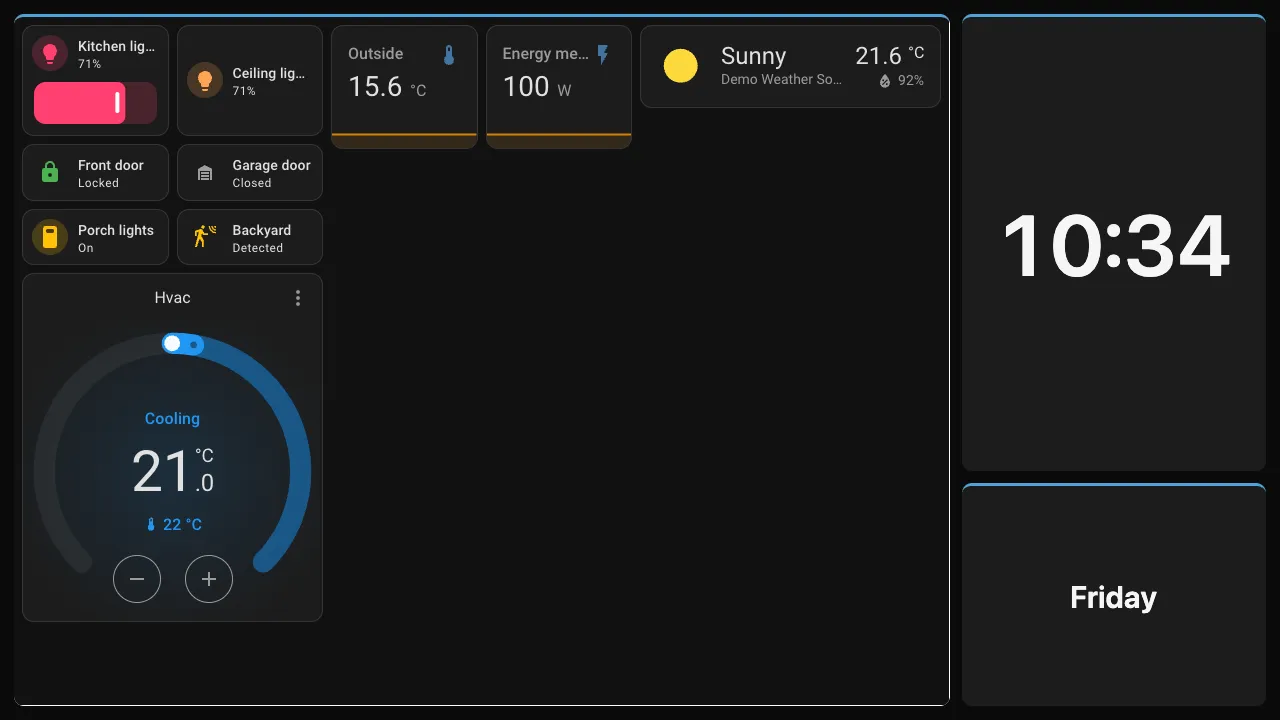
A Home Assistant dashboard on a TV, full screen or in one cell next to a clock or a menu. It opens already signed in, it fills the screen without Home Assistant’s header and sidebar, and it stays up to date because it is the live dashboard, not a picture of it.
Jun already had Home Assistant on a small box at home, with a dashboard for the kitchen: lights, the front door, the energy meter. A Fire TV Stick 4K runs Moon Suite on the kitchen TV. The steps below are what it took to get one onto the other.
What you need
- Home Assistant running on your home network, and a TV already showing a moon. We tested on a Fire TV Stick 4K with Home Assistant 2026.10.
- Home Assistant and the TV on the same network. The TV reaches Home Assistant directly, so Moon Suite never sees your Home Assistant.
- Access to your router, to reserve two addresses.
- Access to Home Assistant’s settings and, for step 3, its
configuration.yamlfile.
Below, Home Assistant is at 192.168.1.50 and the TV at 192.168.1.60. Yours will differ.
1. Use the IP address, not homeassistant.local
Names ending in .local are found by a method called mDNS, which a TV’s web view can’t use. http://homeassistant.local:8123 loads on your laptop and fails on the TV.
- Find Home Assistant’s address. In Home Assistant, open Settings > System > Network, or look at your router’s list of devices.
- In your router, reserve that address for Home Assistant, so it never changes. Routers call this a DHCP reservation or a static lease.
- Use
http://192.168.1.50:8123wherever the guide says the address.
2. Allow Home Assistant to be shown inside another app
Home Assistant tells browsers not to show it inside another page. A Moon Suite cell is another page, so it shows an error. Turn that off with the Home Assistant setting use_x_frame_options, set to false.
Where it lives depends on your version:
- Home Assistant 2026.10 and later keeps its HTTP settings in its own storage, after a one-time move from
configuration.yaml. Thehttp:block in the file is ignored. We have not checked whether a settings screen offers this option yet, so use the websocket API, as we did on 2026.10.4: 1. In Home Assistant, open your profile, then Security > Long-lived access tokens, and create a token as an administrator. Treat it like a password. 2. Save the script below asha-http.mjs, with your address and token. It needs Node 22 or later. 3. Runnode ha-http.mjs. Home Assistant restarts itself after the change; the script waits for it and then makes the setting permanent, so it survives recovery mode.
const URL = 'ws://192.168.1.50:8123/api/websocket'
const TOKEN = 'YOUR_LONG_LIVED_TOKEN'

const open = () =>
  new Promise((resolve, reject) => {
    const ws = new WebSocket(URL)
    let id = 0
    const pending = {}
    ws.onerror = () => reject(new Error('cannot connect'))
    ws.onmessage = (e) => {
      const m = JSON.parse(e.data)
      if (m.type === 'auth_required') ws.send(JSON.stringify({ type: 'auth', access_token: TOKEN }))
      else if (m.type === 'auth_ok') resolve((msg) => new Promise((res) => { pending[++id] = res; ws.send(JSON.stringify({ ...msg, id })) }))
      else if (m.type === 'auth_invalid') reject(new Error('bad token'))
      else if (pending[m.id]) pending[m.id](m)
    }
  })

const send = await open()
const current = (await send({ type: 'http/config' })).result
const { created_at, error, error_message, ...stable } = current.stable ?? current
await send({ type: 'http/config/configure', config: { ...stable, use_x_frame_options: false } })

let back
while (!back) {
  await new Promise((r) => setTimeout(r, 5000))
  back = await open().catch(() => null)
}
console.log(await back({ type: 'http/config/promote' }))
process.exit(0)
On older versions, set it in configuration.yaml and restart Home Assistant:
http:
  use_x_frame_options: false
3. Make a display user and sign the TV in by itself
You can type a password on the TV with its remote, and it works, but you’ll type it again after the app’s data is cleared or the session expires. A wall display shouldn’t ask.
- In Home Assistant, open Settings > People > Users and add a user for the TV, for example
moonsuite. Leave Administrator off and turn on Can only log in from the local network. - Copy that user’s ID, from the user’s details.
- In your router, reserve an address for the TV, here
192.168.1.60. - In
configuration.yaml, add this, with the ID you copied:
homeassistant:
  auth_providers:
    - type: trusted_networks
      trusted_networks:
        - 192.168.1.60/32
      trusted_users:
        192.168.1.60: <the user ID>
      allow_bypass_login: true
- type: homeassistant- Restart Home Assistant.
The trusted_networks block must come before - type: homeassistant. If it comes after, the TV still gets the login form.
The /32 means exactly one address, the TV’s. Every other device keeps the normal login.
4. Hide the menus with kiosk-mode
Home Assistant draws a header and a sidebar around every dashboard. On a TV they are in the way.
- Install kiosk-mode (NemesisRE/kiosk-mode) through HACS, Home Assistant’s add-on store, and reload.
- Open the dashboard you want on the TV, and note its full address, for example
http://192.168.1.50:8123/lovelace/0orhttp://192.168.1.50:8123/dashboard-kitchen/0. - Add
?kioskto the end:http://192.168.1.50:8123/dashboard-kitchen/0?kiosk.
Use the full path to a dashboard and its view, not the bare address. The bare address redirects, and the redirect drops ?kiosk.
5. Add it to a moon
- In the editor, open the moon for that TV and add a Web page widget.
- Paste the address from step 4 into Page URL.
- Leave Reload every at 0 so the page isn’t reloaded. Home Assistant updates itself.
- Make the cell as big as you like; a whole screen works well. Publish, and the TV shows it at its next check.
When it doesn’t work
Each message below is what the cell shows, and what to change.
| You see | It means | Fix |
|---|---|---|
Webpage not available, ERR_NAME_NOT_RESOLVED | The TV can’t find the name. .local names don’t work on TVs. | Use the IP address, step 1. |
ERR_BLOCKED_BY_RESPONSE | Home Assistant refuses to be shown in another app. | Set use_x_frame_options to false and restart Home Assistant, step 2. |
| Home Assistant’s login page | The TV isn’t signed in. | Check that trusted_networks is before homeassistant, that the TV’s address matches the reserved one, and that you restarted, step 3. |
| The header and sidebar are showing | Kiosk look isn’t applied. | Install kiosk-mode and use the full dashboard path with ?kiosk, step 4. |
| A blank cell in the editor preview, but it works on the TV | The editor is on https:// and Home Assistant is on plain http://, and browsers block that mix. | Check it on the TV. The preview can’t show it. |
| It worked, then stopped | The router gave Home Assistant or the TV a new address. | Reserve both addresses, steps 1 and 3. |
Keep it safe
- Anyone on the TV’s address gets the display user’s access. Trusted-network sign-in trusts the address, not a person. Reserve the TV’s address, trust only that one, and don’t use the display user for anything else.
- Keep the display user small. Not an administrator, local only, and its own dashboard.
- Don’t open Home Assistant to the internet for this. The TV reaches it over your home network.
- Plain
http://stays inside your home. Don’t use these steps for a Home Assistant you reach over the internet.
About the story. The people and businesses in these guides are made up. They show how we expect a moon to be used, not the experience of real customers.


